Friday, April 22, 2005
Filtering by the Date field in Excel
Today's post comes from Exceltip.com
To filter by date:
1. If the List is in Filter mode, turn it off by selecting Filter, and then AutoFilter from the Data menu.
2. Copy the Date column.
3. Select two columns to the right of the Date field.
4. Press Shift+F10 and then press Ctrl++ or right click, and select Insert Copied Cells from the shortcut menu (pasting by inserting copied cells allows one to insert two columns, and paste the copied column into them).
5. Change the titles for the two columns to Month and Year.
6. Select the Month column and press Ctrl+1 to format the cells.
7. In the Number tab, select Custom.
8. In the Type box, enter the format mmmm (full month format), and click OK.
9. Repeat steps 6 and 7 for the Year column.
10. In the Type box, enter the format yyyy (full year format), and click OK. You can now filter by any month or year.
11. The List is now ready to filter according to Month and Year criteria.
Read the tip, add a comment, see screenshot at ExcelTip.com site
Friday, April 15, 2005
Moving is complete - regular transmission to resume shortly
We have finished moving, now to finish cleaning!
Then we are going overseas on holiday, but I will resume posting before then and post regularly while I am away also.
Thanks for being patient and keep sending your problems to solve. I will publish results on the site once they are solved.
Tuesday, April 12, 2005
Moving house - no posts for a week
We are moving house and offices and there probably won't be any tips for about a week.
I may surprise myself and do one anyway but don't hold your breath.
Send me your Excel questions to solve if you want and I will publish them here with the solutions.
Have a great week!
Friday, April 08, 2005
Two type charting
Rob Van Gelder who contributes on Dicks Blog (Daily Dose of Excel) has written a great article on building charts with two different types (eg line and column) on the same chart. The comments also have some very interesting information in them so check it out on his website.
Wednesday, April 06, 2005
Using the Resize property in Excel VBA to change a range size
Jon and Rob both showed me how to get the same result as I got in yesterdays post using a For Next Loop by using the Resize property.
The Resize property operates on the range collection and resizes it (obviously) using the following syntax.
expression.Resize(RowSize, ColumnSize). Both the rowsize and columnsize numbers are optional.
Here is the revised code from yesterday.
Dim linetext, i
Sub write_lines()
'Macro written by www.spyjournal.biz April 2005
linetext = ActiveCell.Value
ActiveCell.Resize(100).Value = ActiveCell.Value
End Sub
In this case the expression is the ActiveCell and the the column numbers are ignored as the row numbers are 100.
For Next Loops are actually slower than this becuase there are multiple cycles required and that requires CPU time where the Resize property is much faster as it only operates once.
Thanks guys
Tuesday, April 05, 2005
How to complete Bart Simpsons lines in Excel
Using a very simple piece of code this will take the text in the activecell and repeat it 99 times (giving a total of 100) in the cells below.
Make sure you have your cursor placed on the cell with the text you want to repeat.
Copy this code into a Module in a VBA Project (Use ALT F11 to open the VBA Project Editor).
Run the code (F5).
Dim linetext, i
Sub write_lines()
'Macro written by www.spyjournal.biz April 2005
linetext = ActiveCell.Value
For i = 1 To 99
ActiveCell.Offset(i, 0).Value = linetext
Next
End Sub
Try it yourself. See what other uses this could be put to. For Next loops are very useful when writing code that has to perform the same function over and over again..
Monday, April 04, 2005
Using Freeform lines in Excel
Andrew from Andrew's Excel Tips has posted two great articles about using freeform lines in Excel.
The first article shows how to create freeform shapes and some uses.
The Freeform button
You can access the Freeform button, from AutoShapes, Lines or you might find it worth your time to drag a button to a suitable toolbar if you plan on using it often. (Select Tools, Customize, Commands, AutoShapes and scroll down to Freeform)
Old and New Excel Versions
This is where it gets tricky. If you draw an enclosed shape using a Freeform line, the shape then becomes opaque and I seem to remember that the Transparency features of older Excel versions are not as good as the more recent versions. The best you can choose in this case is Semitransparent, which is grainy and quite hard to see through.
There is a simple solution. Draw an almost enclosed shape (use the white tags to adjust the size and/or increase the zoom size to make things easier). Right-click the shape and choose Close Path. You now have an totally enclosed shape that is perfectly transparent. (Or you could just double click an already opaque enclosed shape, then select No Fill for the Fill Color)
The second article goes into detail about creating complex and 3D shapes.
For full articles and pictures of the results go to his website.
Full article 1
Full article 2
Friday, April 01, 2005
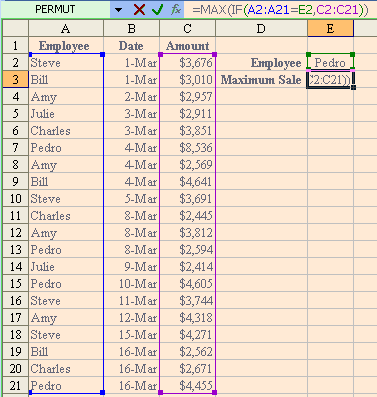
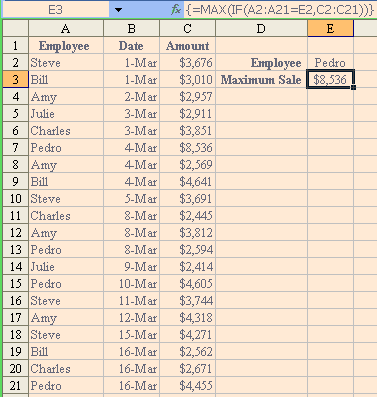
Using the MAX function in a CSE Formula in Excel
CSE (or CTRL SHIFT ENTER) formulas can be used to make functions do things they normally can't do.
For example the MAX formula will usually only find the largest value in a range of values. But what say you wanted to find the largest value in a column based on a value in another column.
The attached pictures illustrate how this can work useing a CSE formula.
Using the example of a list of employees and their sales over a period from which you wish to find the maximum sales for the employee for the period.
The required formula is MAX(IF(A2:A21=E2,C2:C21)), but it must be entered as a CSE formula. That is once you have typed the formula hold CTRL and SHIFT down as you press Enter. This creates the squiggly brackets {} (squiggly is a highly technical term) around the formula.
I have attached two pictures. The first shows the cell when it is being edited and the colours outlining the ranges. The second shows the result of the formula and the squiggly brackets in the formula bar.
Thanks to one of my readers Mark for supplying this one.
The Excel Guru's Free Tips and Hints.

Welcome
Welcome to the Excel Tips blog. Free Microsoft Excel Tips and Hints designed to increase your productivity.
Advertisement
Subscribe Me
Previous Posts
- New Website
- New Open XML file formats in Office 2007
- Maximum Length of Macros
- Undiscovered Excel Funtions and Features
- Excel VBA Macro Shortcut Keys
- Excel 2007 Tips
- List of Macro Shortcuts in All Open Workbooks
- Excel 2003-2007 conversion project
- Excel 2007 and backward compatibility
- Clear Excess Formatting in Excel Files
My Blogs and Websites
- Spy Journal Home
- Spy Journal Archives
 Personal Blog
- Excel Tips Blog
- Blog Tips Blog
- Tech Tips Blog
- Urban Space Novel
- Photo Archive
- Parklife Results
- Parklife Soccer Club Website
- KROSTech LAN Parties
- Jethro Management
- Jethro Consultants
- Oz Bush Poet
Excel Links
- ---RSS Feeds---
- Unofficial Microsoft Office Stuff
- KC on Exchange and Outlook
- Office Zealot
- Automate Excel
- Colo's Excel Junk room
- Daily Dose Of Excel
- The Planning Deskbook
- Excel Pragma
- Andrew's Excel Tips
- ---No RSS Feed---
- Excel Tip
- Mailbarrow
- Experts Exchange
- AJP Excel Information
- Beyond Technology
- Contextures
- ExcelTip
- Mr Excel
- Pearson Software Consulting
- Peltier Technical Services
- John Walkenbach - J-Walk
- Vangelder (wont work in Firefox)
- VBA Express
- xlDynamic
- The Excel Nexus
- Code Net
- Better Solutions
- Excel Business Tools
- Data Pig Technologies
- VBA Express
Archives
- October 2004
- November 2004
- December 2004
- January 2005
- February 2005
- March 2005
- April 2005
- May 2005
- June 2005
- July 2005
- August 2005
- September 2005
- October 2005
- November 2005
- December 2005
- January 2006
- February 2006
- March 2006
- April 2006
- May 2006
- June 2006
- July 2006
- August 2006
- September 2006
- October 2006
- November 2006
- December 2006
- January 2007
- February 2007
- March 2007
- April 2007
- May 2007
- June 2007
- September 2007
- Current Posts
Other Links


Copyright Notice. All documents and text contained in this web site www.spyjournal.biz and sub pages is copyright material of Jethro Management (c) 2004 unless noted as being copyright material of someone else. No public reproduction of the content on this site in any form is permitted without express written permission.
Unless otherwise expressly stated, all original material of whatever nature created by Tim Miller and included in this weblog and any related pages, including the weblog's archives, is licensed under a Creative Commons License.