Friday, June 17, 2005
Picasa updates
Picasa has a bunch of exciting things that can be done with it that aren't obvious to the casual glance. Here's the low down from Picasa on backing up your photos.
Are your photos backed up?
No? Well, you're not alone; 3 out of 4 of us use our computer's hard drive as our primary method for storing photos, and many of us have never saved backup copies to another storage location like a CD, DVD or external drive. But why let one blue screen of death erase your most precious memories when Picasa makes the backup process a snap? Picasa remembers which photos in your library you've backed up, and which (yikes!) you haven't; preserves any edits or changes you've made to your photos with Picasa; and even lets you undo any backed up changes later on.
So.
The project: Create a backup set of photos using Picasa. It takes only minutes.
You'll need: A blank CD or DVD (the kind you use in your computer, not the TV) or an external drive; a computer with a CD/DVD writeable drive.
1. Open Picasa (make sure you are using version 2; if not, download it now from www.picasa.com). In the menu at the top of your screen, go to Tools > Backup Pictures, or click the "Backup" button at the top of your screen. This will open a box containing backup instructions in the lower third of your screen.
2. Under Step 1, click the "New Set" button to name your backup set (a set is all the pictures you want saved). A "New Backup Set" box opens. 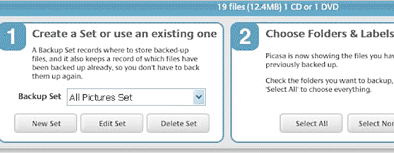
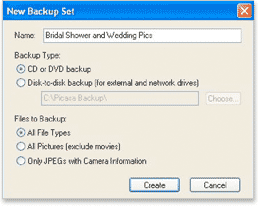 3. Type in the name for your backup in 16 characters or less.
4.Select a backup type, either "CD or DVD backup" or a "Disk-to-disk backup (for external and network drives)."
5.Select the files to back up, either all file types, all pictures excluding movies, or only JPGs with camera information (information like camera make and model and if a flash was used).
6.Click the "Create" button. This will close the "New Backup Set" box and return to the backup instructions. 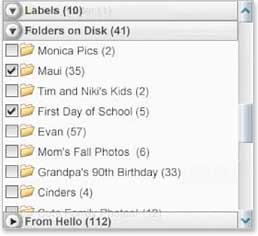 7. Look at the list of folders and labels along the left side of your screen. A checkbox has appeared to the left of each name. The folder that's currently active has an "X" in the checkbox; you'll be backing up these photos.
8. To add more photos to this backup set, put an "X" next to every folder and label that you want archived. You can do this one at a time or, under Step 2, click the "Select All Pictures" button to have Picasa add an "X" next to all the photos in your collection.
9. As you select more photos, look at the message appearing on the blue bar across the lower third of your screen. This tells you how much space your backup will require, including the number of CDs you'll need.
10. Are all your photos selected? Make sure you have a CD or DVD in your writeable drive, or that the external drive you're saving to is connected. Now click the "Burn" button. If you chose "CD or DVD backup," Picasa will prompt you when you need to insert an additional disk to your drive.
11. Relax! You're now far less likely to ever lose any of those irreplaceable pics.
Microsoft stuff, Linux stuff, Visual Basic stuff, Coldfusion and PHP stuff and other geeky stuff.
Contributors
Welcome
Welcome to the Tech Tips blog. Hints and tips for programmers, sysadmins and web developers and other geeky stuff that didn't fit anywhere else.
Advertisement
Subscribe Me
Previous Posts
- Brothers In Arms
- What's to come from Google, Yahoo and Microsoft?
- Configuring a D-Link DI624+
- Case Mod Supplies
- Make Yoda From A Single Piece of Paper
- Tech Tip of the Year
- PhotoShop workflow
- Google Sitemaps (Beta)
- Interesting web stats
- My new phone is a Sony Ericsson S700i
My Blogs and Websites
- Spy Journal Home
- Spy Journal Archives
 Personal Blog
- Excel Tips Blog
- Blog Tips Blog
- Tech Tips Blog
- Urban Space Novel
- Photo Archive
- Parklife Results
- Parklife Soccer Club Website
- KROSTech LAN Parties
- Jethro Management
- Jethro Consultants
- Oz Bush Poet


